
Saturday 16 December 2017
YIKES!
Saturday 14 October 2017
Leveling compound
Went to the Annapolis boat show....cool! Back at it now. I have three layers of heavy bi-axial woven mat and 3 gallons of epoxy on the new hard top. I just picked up a gallon and a half of leveling compound from West system. Fantastic stuff. I have applied one coat, sanded and just spread the second coat. Looking good! I will finish the top and bottom but leave it primed with a two part epoxy primer. I will let the canvas people do their worst and then pull the top and finish it. that way any 'boo boo's ' can be repaired prior to final paint. The boat gets pulled in a few weeks and the fun starts then.


Monday 11 September 2017
AND SO IT STARTS!!!
Well, fall is here
and lazy summer sails are coming to an end, all in all the boat worked
well. We spent a week on board and were very comfortable. The water pump
failed, I replaced it, a few wiring bugs. The tranny acts up sometimes.
The cone clutch is glazed and it needs rebuilding. That might get
tackled this winter. We decided to go with a hard dodger, I am building
it. The structure is just foam with a plywood skeleton. I bought 4
gallons of epoxy 1 gallon of hardener. I got a deal on 350 feet of woven
mat fiberglass.
 Seen here, the basic shape with on layer of fiberglass. To do the edges I use tape to pull an oversize strip tight. then soak with epoxy followed by thickened epoxy to fill the voids. Then...grinding!
 You can see the corner lacks wood here, I lost to much after forming the radius. So i simply cut the foam away behind it and filled with thickened epoxy. I want to get three layers all around. I am making the poles and plates from aluminum.


Wednesday 5 July 2017
Lots of work- a little sailing!
Spent the weekend at Pelee Island, had a great time. The boat ran ...okay... I had a few bugs.
 The air con failed after a few days, it clogged up in the valve above the thru hull. I have installed 3/4 fittings but the valve is a little better than 3/8 when open. That will be resolved this winter with a much bigger thru-hull and valve. I got it working, but what a piss off!
I started upgrading the electronics, the boat cane with Vigil radios. The company is long gone and these radios are pretty useless. I went with Standard Horizon GX 1700 with GPS and the Ram3 extension. Here is before.....

 The left side of the board got a sprucing up. Everything is rewired correctly. For everything I fixed, I found three more nightmares to be dealt with in the future.


I started upgrading the electronics, the boat cane with Vigil radios. The company is long gone and these radios are pretty useless. I went with Standard Horizon GX 1700 with GPS and the Ram3 extension. Here is before.....


Sunday 11 June 2017
Workin' on my new 42
My wife and I liked the room on board and the layout. It is fairly well built. The most important thing to me is that it has scratches and dents! The plan is to head south when we retire. I know we will bang it up at various marinas. To go it in a shiny gold plater just to have a rusty dock nail scrape along the side would bring me to tears. This boat is a great lake vessel, never seen salt. The guy who I bought it off did some horrible work. We are finding, as a rule that everything he did needs tearing out. He purchased a new MarineAire 18,000 BTU air conditioner, which is great....but... he bought a garden pump from Harbor freight and garden hose to plumb it up. What a mess. I ripped it all out. I ditched the crappy pump and ordered a magnetic 550 gallon per hour pump from MarineAire. I purchased a large Groco bronze strainer and the correct heavy duty, approved hose to do the plumbing. I had one tri- fitting that had to be 3/4 NPT, 5/8 barb, 3/4 barb. When I hobbled something together, it looked ridiculous. I decided to purchase a block of 316 stainless and carve out a one piece fitting on a 4 jaw chuck. It came out nice. As of today I am just waiting for the hose to show up. I still need to run new wiring to a separate 120 volt plug (something else he screwed up) I want to concentrate on the 'bones' as much as possible and hold off on things like up to date instruments. I would like to do that prior to retiring, thus giving me a warranty while underway. The only other strainer in the boat is a plastic bowl built by SC Marine. Never heard of them. This is the strainer for the Yanmar and we decided to bite the bullet and change it too. I purchased a 600 dollar monster. 1 1/2 inch fittings to match the intake hose. The supplier said it was overkill but I argued that the intake is 1 1/2 on the cheesy factory unit, I figure there is a reason for that, such as making sure any garbage that gets sucked in makes it to the basket.
 Bronze strainer porn!!!
 Holding the combo pump and strainer from harbor freight, note the grey garden hose.
ALSO, please note our lovely flooring, it is bamboo from home depot. YES, that is going too. All in good time. One good thing about the crappy work done by the idiot who owned it, it is easy to reverse and I got the boat for a grrrreat price!!
-----------------------------------------------------------------------------------
The next big SNAFO involved a thru hull. The knot meter has a two inch transducer. I would guess that a lift strap caught it, the flange cracked and we had water in the bilge. We motored the boat back to the yard and pulled it.
 That's not good!

The one on the left is missing that 'flangy thing" Scary stuff!


ALSO, please note our lovely flooring, it is bamboo from home depot. YES, that is going too. All in good time. One good thing about the crappy work done by the idiot who owned it, it is easy to reverse and I got the boat for a grrrreat price!!
-----------------------------------------------------------------------------------
The next big SNAFO involved a thru hull. The knot meter has a two inch transducer. I would guess that a lift strap caught it, the flange cracked and we had water in the bilge. We motored the boat back to the yard and pulled it.


The one on the left is missing that 'flangy thing" Scary stuff!
Thursday 1 June 2017
SOLD...and introducing 'Gimme Shelter3'
I would like to thank everyone who showed interest in my O'Day 30. She sold very quickly. It appears the boat will stay on Lake St.Clair. here the happy owners sail her away.

The big news is, I bought a new boat, a Catalina 42. It is a 1991 Mark 1. As with all my boats, it needs work. I will cover that work here. I spent the last week waxing and polishing. The prior owner was an idiot. Everything he did was done cheaply, outside of that it is a good solid boat. I plan to go right thru it and up date as required.
 Away we go!
 2 gallons of bottom paint. one week of cleaning compounding and waxing.

The big news is, I bought a new boat, a Catalina 42. It is a 1991 Mark 1. As with all my boats, it needs work. I will cover that work here. I spent the last week waxing and polishing. The prior owner was an idiot. Everything he did was done cheaply, outside of that it is a good solid boat. I plan to go right thru it and up date as required.


Monday 15 May 2017
Up for sale
Well, the O'day is up for sale. I still have a few little jobs to do. I put signs on the boat on Sunday, I have shown it three times, got another guy tomorrow. Fingers crossed.
 I took this picture back in 2011 at the boatyard in St.Claire shores Michigan. I took the bottom down to the gel-coat and rolled on a 2 part epoxy coating, three coats.

Wednesday 10 May 2017
Light at the end of the tunnel
Putting her back together. I dug thru the garage and pulled everything out. Still some things I can't find! The roof mounted fittings for adjusting the main are re-drilled and back in place with lots of bedding compound. The real nightmare was the grab rails. They were never trustworthy. They had a tiny 3/16 bolt that continually sunk into the teak and let them get lose. On this boat they are very important but a weak design. I now have my system of machined pucks, 1/4 -20 threaded rod and exposed SS nuts inside the boat. No cheesy teak plugs. I hope to have it done and up for sale sometime this weekend but there will still be a few things to do. It's a boat.


Sunday 7 May 2017
Painting and waxing!
Another day at the boat yard. I got the bottom done, the hull waxed and Liz put the final two coats on the ceiling. Looks good! Now I am down to the nuts and bolts stuff, rigging and putting the interior back in her. Everything is wrapped in plastic in the garage. Should make good progress this week.


Saturday 6 May 2017
HI HO HI Ho.....
I spent about 8 hours on the O'day today. I scrubbed up the bottom, ready to receive new bottom paint. I scrubbed the hull and started waxing. Inside I thickened epoxy and used a scrub brush to copy the original faux finish on the ceiling. My art work is a little different than the original but not bad. you wipe the epoxy around in paint tray with the little scrub brush and tap it on the ceiling. It leaves stalagmites but they break of like icicles once hardened. I got a coat of paint over it. Looks OK. 2 more coats tomorrow. Up in the bow I am replacing the old fabric which was pretty tired with a light grey fabric. I bought a big can of contact cement ...but ran out before I finished. Picked up another can on the way home.

The ceiling is coming along. The wife is doing the painting tomorrow. Finally some decent weather.
 Needs a few more coats.
 Now it is time to talk about something that I consider the weakest part of sailboat design. I speak of course of the hated mast boot. In my opinion, the current options are delivered by the agents of Satan!!! I just spent a ridiculous amount of time fixing damage directly related to this issue. O'Day or the dealer is partial responsible for this. They cut the hole for the mast and left it unfinished. Water leaked down the useless boot over the years and was sponged up by exposed balsa core.
What surprises me is that everyone I talk to with a sailboat bitches about it. The mast is not static, you bend it back for tightening the jib, that and wind pressure flexes it at the deck level and your lousy boot eventually leaks. I was offered a 70 dollar boot by the yard but it requied the mast to be pulled. Defender makes a few that wrap around, but they are round and this mast is rectangular in cross section. I follow a few blogs writen by live aboard's and I asked what they do. The answer I received surprised me.
I was ready to pour two tubes of caulking into the abyss, but they advised me differently. A toilet bowl wax ring....you heard me. It makes sense. I pushed neoprene into the gap between the chocks and then pulled the thick wax ring apart. you push it down into the gap and fill it up. The beauty is that it stays flexible and can be easily cleaned off, next time the stick gets pulled. Following that I cut a a rubber wrap from a new inner tube. This is glued and clamped. The last step is that crappy mast tape. The difference this time is that it is just icing on the cake. It always leaks, never stretches as advertised. It no longer matters. I will update tomorrow after we have another day of...errr fun.

The ceiling is coming along. The wife is doing the painting tomorrow. Finally some decent weather.


What surprises me is that everyone I talk to with a sailboat bitches about it. The mast is not static, you bend it back for tightening the jib, that and wind pressure flexes it at the deck level and your lousy boot eventually leaks. I was offered a 70 dollar boot by the yard but it requied the mast to be pulled. Defender makes a few that wrap around, but they are round and this mast is rectangular in cross section. I follow a few blogs writen by live aboard's and I asked what they do. The answer I received surprised me.
I was ready to pour two tubes of caulking into the abyss, but they advised me differently. A toilet bowl wax ring....you heard me. It makes sense. I pushed neoprene into the gap between the chocks and then pulled the thick wax ring apart. you push it down into the gap and fill it up. The beauty is that it stays flexible and can be easily cleaned off, next time the stick gets pulled. Following that I cut a a rubber wrap from a new inner tube. This is glued and clamped. The last step is that crappy mast tape. The difference this time is that it is just icing on the cake. It always leaks, never stretches as advertised. It no longer matters. I will update tomorrow after we have another day of...errr fun.
Monday 1 May 2017
The best laid plans of mice and men!
I am ready to paint....It is May.....It is too cold. I might get a shot on Wednesday, but even then it will be a mere 60 degrees. I hoped to be done by the weekend but mother nature might delay me. I have to check the bottom paint to see the minimum temp, I suspect it is fine though. As for wax, not so much.
 I am refinishing the rails. I have the whole assembly apart and in my garage. The new finish is still tacky. It is just too cold. I tossed the long 3/16 screws, I bought 1/4 inch SS threaded rod and machined up 3/4 pucks for the outside. Acorn nuts inside. I never trusted it, this will make it bulletproof. Here is a crappy sketch....


Saturday 29 April 2017
I worked on the O'day all day! I scrubbed down the top side. My wife cleaned up my mess inside. I want to wax the hull and put the bottom paint on but it is cold and wet. That puts the brakes on that. I will scrub up the hull tomorrow if it isn't raining. Otherwise I will work on the grab rails. I never liked the way they were set up so I took them out. O'day bolts the outside grab rails to the inside ones. They use a cheesy 3/16 screw with a tiny bolt. It pulls lose. I made up aluminum pucks that will be bedded in the top. A 1/4 SS threaded rod will run through to the inside. It will have a washer and brass acorn nut finish. A few shots from today. The pedestal is still wrapped up but I will get that together this week along with the Bimini top.

 The repair area is waiting for polyurethane paint. I have it, but it will have to wait for warmer temps. Going to look great. More scrubbing tomorrow!!!


Thursday 27 April 2017
There are two teak pads on the inside roof, three long 1/4-20 bolts pass through the rooftop and up to the traveler on each side. The bolts are forever coming loose. The problem is the seasonal drying cycle of the wood and the tiny washers which sink into the soft teak.

I made up two strips of 3/16th fiberglass flat stock to even up the load.

The next step was to cut a shallow groove in the teak.
 I transferred the holes. I will sand and finish the teak and paint the strip black.

 One more mini job knocked off. I picked up bottom paint today, I am getting close to putting her up for sale.

I made up two strips of 3/16th fiberglass flat stock to even up the load.

The next step was to cut a shallow groove in the teak.


Saturday 22 April 2017
Finished with the fiberglass work!!!
I started at 8;30 this morning and worked till 5. I have been putting in two hours every night after work. This was where I did my grinding and adding new glass and running the vacuum pump. I didn't need any of that today! I was skimming and long boarding along with a little palm sander finishing. My vacuum bagging was crude. I bought a pump from Harbor Freight. I ran a flex tube to a jar lid, another ran out to the area I was working on. The area was surrounded by a special tape that is just putty in tube form. I lay a piece of drop cloth over that and had the tube run through it. I kept duct tape handy for leaks and did my lay up. I press the plastic over it and start the pump. If any epoxy got in the tube, it was pulled back to the jar. I just threw that piece of tube away. I would usually put up two layers of glass per vacuum set up. I tried to do it with out the pump, but it always filled with huge bubbles. No good!
Anyway, here is the finished repair. Most of the area is the actual fiberglass, I kept the skim coats very thin. Next up is a primer coat and then a polyurethane paint job. I will spend some of Sunday, cleaning up and hauling my tools home.
 before....
 After...a Picasso
...................................................................................................................................
I opened up a strip to the port side of the mast but it was dry!
Anyway, the mast and the hatch have been completely blocked. The balsa core was exposed at both locations, creating my little nightmare.
 ...................................................................................................................................
Behind the hatch is a fitting that has to be re-drilled (two actually!) They have been filled with solid fiberglass, no core at all. In the bottom left, you can see one of my test cores. I have drilled a few under the sides, to my surprise, the core is plywood.
I found a damp spot over the TV. It has been open for a month and is dry. It is near impossible to get everything 100%. That said I think I have turned the tide, There is always something to do, something to fix. There are a few boats in the yard with wet hulls. That is a death sentence, it is the reason I always insist on buying boats with solid hulls.

..........................................................................................................................
A couple of more shots. hopefully, I will have a picture of the finished product next week.


Anyway, here is the finished repair. Most of the area is the actual fiberglass, I kept the skim coats very thin. Next up is a primer coat and then a polyurethane paint job. I will spend some of Sunday, cleaning up and hauling my tools home.


...................................................................................................................................
I opened up a strip to the port side of the mast but it was dry!
Anyway, the mast and the hatch have been completely blocked. The balsa core was exposed at both locations, creating my little nightmare.

Behind the hatch is a fitting that has to be re-drilled (two actually!) They have been filled with solid fiberglass, no core at all. In the bottom left, you can see one of my test cores. I have drilled a few under the sides, to my surprise, the core is plywood.
I found a damp spot over the TV. It has been open for a month and is dry. It is near impossible to get everything 100%. That said I think I have turned the tide, There is always something to do, something to fix. There are a few boats in the yard with wet hulls. That is a death sentence, it is the reason I always insist on buying boats with solid hulls.

..........................................................................................................................
A couple of more shots. hopefully, I will have a picture of the finished product next week.


Saturday 8 April 2017
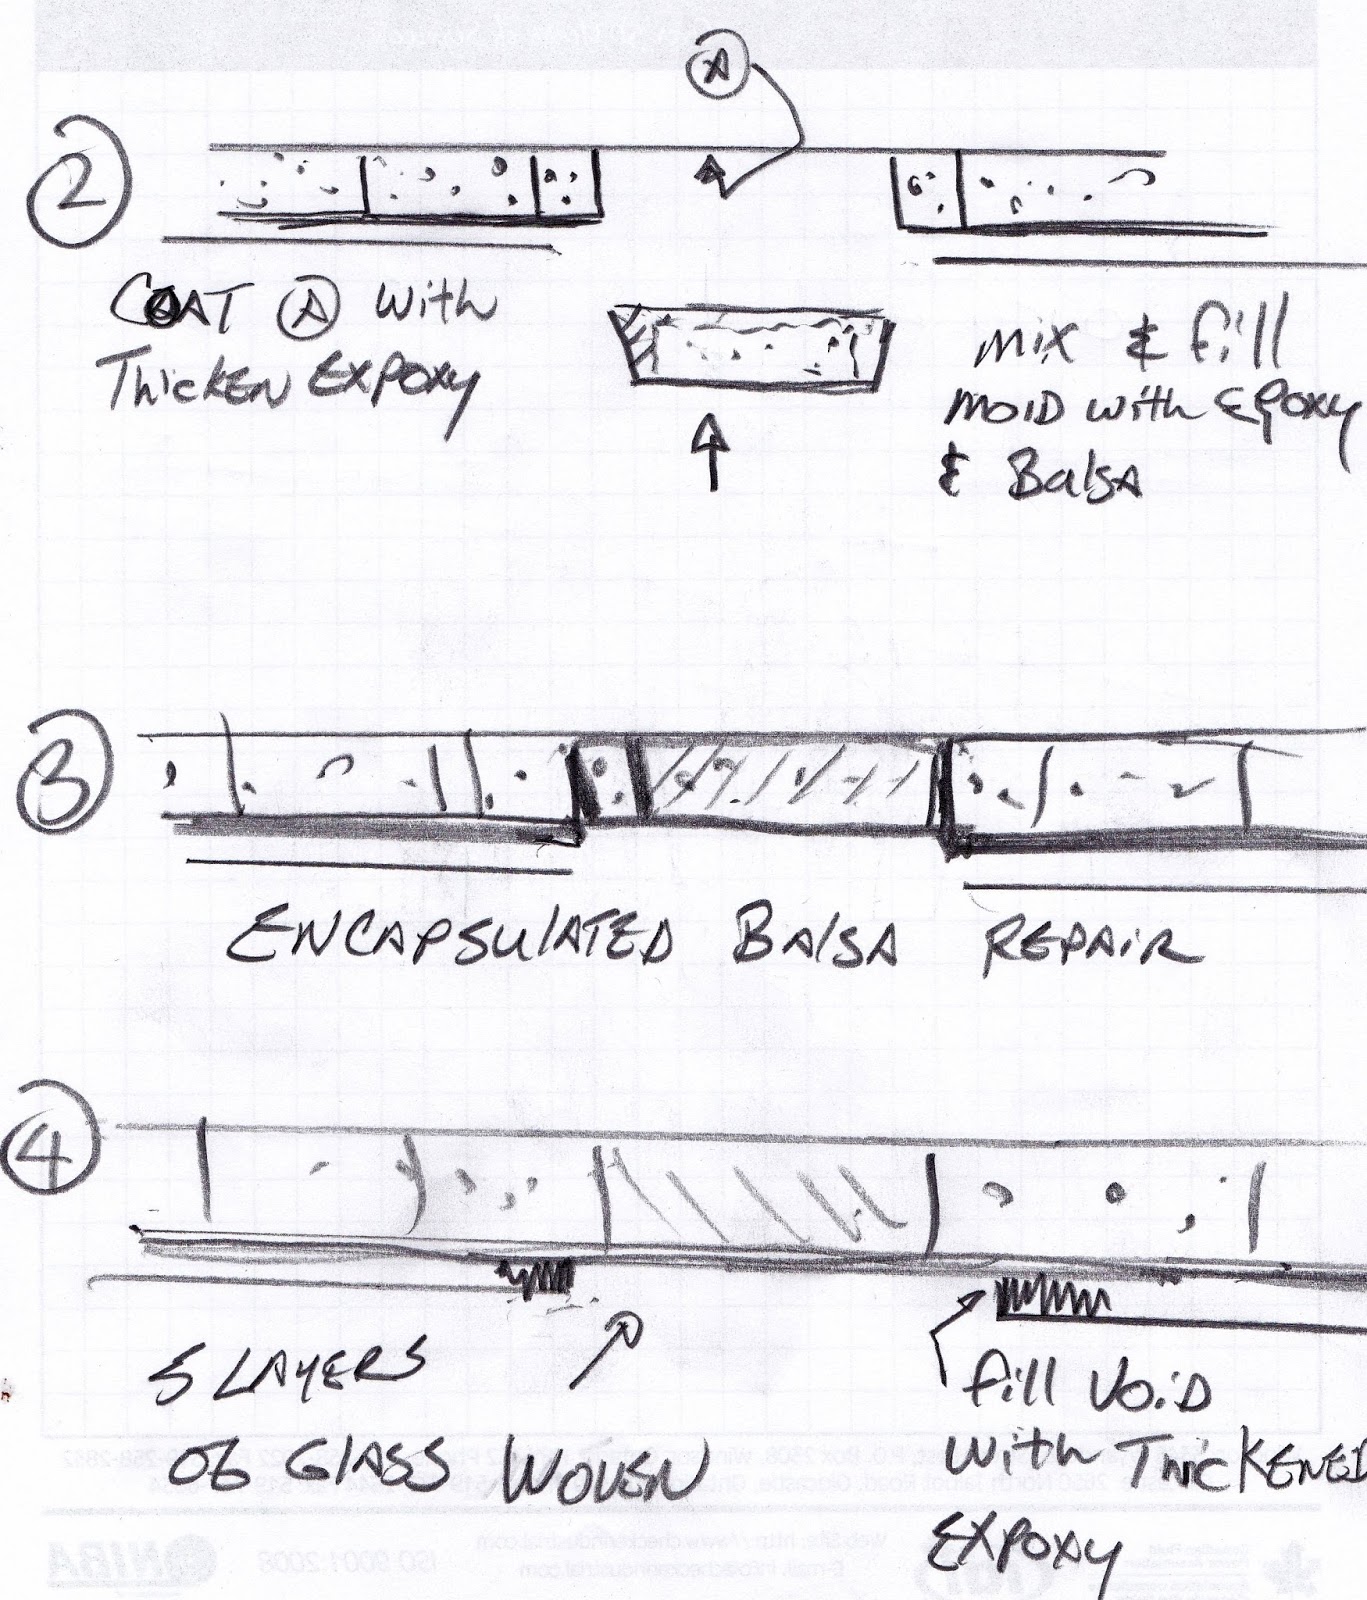
So, for the sake of anyone who might be interested, here is a sketch of the method I am using to repair wet spots in the cabin roof of an O'Day sailboat. Step one, I used a Fein tool to remove the inner shell and then the inner layer of the top proper. the damaged balsa was scraped out, the top layer prepped and coated with a layer of epoxy.

I have explained my method of encapsulating every piece of end grain balsa. This ensures that it can not get wet again.
 I back fill the void between the actual top and the inner shell and then grind it back in order to get a good bond.
 So I keep showing the bad area by the hatch. I have pretty much finished filling, I used a long board to get it straight and now I am at the fine sanding part of the program.


I have explained my method of encapsulating every piece of end grain balsa. This ensures that it can not get wet again.


Monday 3 April 2017
After work I pulled the rails. I want to refinish them. I had two that leaked as the bolt that holds them in place goes thru the cabin top. I bored 1 " holes up to the top layer on those two. The core is dry so the leak must have just ran down the long bolt. I made a couple of guides in order to hold the hole location when I refill. I made them on a lathe today. There is a pin that goes thru the drilled hole in the outer layer. the segment after that is tapered 1 degree (A draft angle) I will wax the pin and locate it. Then using rings of woven glass and epoxy, I will fill the hole back in. I should be able to tap on it from above to knock it out, leaving a core for the new bolt to go thru. Once the fiberglass is built up to being flush, I will grind it back a little and finish with a two part filler. the trick here is to keep that layer thin. I built a long board and have sand paper starting at 80 grit, down to 220. That is going to be fun! Well...onward!


Monday 27 March 2017
Well, I am back at it. I encapsulated the balsa pucks as I described earlier. I thickened epoxy with Westsystem 205. I used disposable syringes to push the mix up between the pucks. Then came the disk grinding. With that done I vacuum bagged the area and laid on bi-axial cloth. This was followed by two layers of glass mat. Then I had to deal with the gap that occurs between the bottom layer of the coach roof and the inner liner. I found a dense foam strip that is a 1/4 inch thick. It worked well. With that done, another layer of bi-axial starts the outer shell. I've got two of them on so far. In an area I am repairing by the mast, There is no gap between the inner liner and the outer layer. I just built up layer after layer until I have it flush. It added a little weight but it should be strong. I will grind it a little under flush and finish with a filler, long board sanding, then I have to find a proper marine paint. I have learned a lot. Vacuum bagging has a downside. It holds the upside down glue up well but you get waves that are hard to get out. I added a fine chopped glass to the mix and that helped. You get bubbles, you can play with it but they are stubborn. The best thing is to work them into one big bubble and grind it out when dry. I have to deal with low temps, the answer is hot water bottles. You heat up water on a butane stove and fill them. Then place them on the outside. With a paint stripper gun inside I got a read of 75 degrees in time for the lay up. Now the warmer weather is here I should be able to avoid that nightmare. I still have lots to do but it is progressing....I hate winter!
 This is the area by the sliding top. I finished with bi-axial. I will grind it smooth and prep to finish.
 This one was weird. There was no moisture here. The balsa was pulverized ant the top was soft here because of it. I can only guess that a very heavy individual stood there while raising the main??? Anyway, it is rock hard now!


Saturday 18 March 2017

Saturday 21 January 2017
Subscribe to:
Posts (Atom)