I spent about 8 hours on the O'day today. I scrubbed up the bottom, ready to receive new bottom paint. I scrubbed the hull and started waxing. Inside I thickened epoxy and used a scrub brush to copy the original faux finish on the ceiling. My art work is a little different than the original but not bad. you wipe the epoxy around in paint tray with the little scrub brush and tap it on the ceiling. It leaves stalagmites but they break of like icicles once hardened. I got a coat of paint over it. Looks OK. 2 more coats tomorrow. Up in the bow I am replacing the old fabric which was pretty tired with a light grey fabric. I bought a big can of contact cement ...but ran out before I finished. Picked up another can on the way home.
The ceiling is coming along. The wife is doing the painting tomorrow. Finally some decent weather.
Needs a few more coats.
Now it is time to talk about something that I consider the weakest part of sailboat design. I speak of course of the hated mast boot. In my opinion, the current options are delivered by the agents of Satan!!! I just spent a ridiculous amount of time fixing damage directly related to this issue. O'Day or the dealer is partial responsible for this. They cut the hole for the mast and left it unfinished. Water leaked down the useless boot over the years and was sponged up by exposed balsa core.
What surprises me is that everyone I talk to with a sailboat bitches about it. The mast is not static, you bend it back for tightening the jib, that and wind pressure flexes it at the deck level and your lousy boot eventually leaks. I was offered a 70 dollar boot by the yard but it required the mast to be pulled. Defender makes a few that wrap around, but they are round and this mast is rectangular in cross section. I follow a few blogs written by live aboard's and I asked what they do. The answer I received surprised me.
I was ready to pour two tubes of caulking into the abyss, but they advised me differently. A toilet bowl wax ring....you heard me. It makes sense. I pushed neoprene into the gap between the chocks and then pulled the thick wax ring apart. you push it down into the gap and fill it up. The beauty is that it stays flexible and can be easily cleaned off, next time the stick gets pulled. Following that I cut a a rubber wrap from a new inner tube. This is glued and clamped. The last step is that crappy mast tape. The difference this time is that it is just icing on the cake. It always leaks, never stretches as advertised. It no longer matters. I will update tomorrow after we have another day of...errr fun.
I am ready to paint....It is May.....It is too cold. I might get a shot on Wednesday, but even then it will be a mere 60 degrees. I hoped to be done by the weekend but mother nature might delay me. I have to check the bottom paint to see the minimum temp, I suspect it is fine though. As for wax, not so much.
I am refinishing the rails. I have the whole assembly apart and in my garage. The new finish is still tacky. It is just too cold. I tossed the long 3/16 screws, I bought 1/4 inch SS threaded rod and machined up 3/4 pucks for the outside. Acorn nuts inside. I never trusted it, this will make it bulletproof. Here is a crappy sketch....
I worked on the O'day all day! I scrubbed down the top side. My wife cleaned up my mess inside. I want to wax the hull and put the bottom paint on but it is cold and wet. That puts the brakes on that. I will scrub up the hull tomorrow if it isn't raining. Otherwise I will work on the grab rails. I never liked the way they were set up so I took them out. O'day bolts the outside grab rails to the inside ones. They use a cheesy 3/16 screw with a tiny bolt. It pulls lose. I made up aluminum pucks that will be bedded in the top. A 1/4 SS threaded rod will run through to the inside. It will have a washer and brass acorn nut finish. A few shots from today. The pedestal is still wrapped up but I will get that together this week along with the Bimini top.
The repair area is waiting for polyurethane paint. I have it, but it will have to wait for warmer temps. Going to look great. More scrubbing tomorrow!!!
There are two teak pads on the inside roof, three long 1/4-20 bolts pass through the rooftop and up to the traveler on each side. The bolts are forever coming loose. The problem is the seasonal drying cycle of the wood and the tiny washers which sink into the soft teak.
I made up two strips of 3/16th fiberglass flat stock to even up the load.
The next step was to cut a shallow groove in the teak.
I transferred the holes. I will sand and finish the teak and paint the strip black.
One more mini job knocked off. I picked up bottom paint today, I am getting close to putting her up for sale.
I started at 8;30 this morning and worked till 5. I have been putting in two hours every night after work. This was where I did my grinding and adding new glass and running the vacuum pump. I didn't need any of that today! I was skimming and long boarding along with a little palm sander finishing. My vacuum bagging was crude. I bought a pump from Harbor Freight. I ran a flex tube to a jar lid, another ran out to the area I was working on. The area was surrounded by a special tape that is just putty in tube form. I lay a piece of drop cloth over that and had the tube run through it. I kept duct tape handy for leaks and did my lay up. I press the plastic over it and start the pump. If any epoxy got in the tube, it was pulled back to the jar. I just threw that piece of tube away. I would usually put up two layers of glass per vacuum set up. I tried to do it with out the pump, but it always filled with huge bubbles. No good!
Anyway, here is the finished repair. Most of the area is the actual fiberglass, I kept the skim coats very thin. Next up is a primer coat and then a polyurethane paint job. I will spend some of Sunday, cleaning up and hauling my tools home.
before....
After...a Picasso
...................................................................................................................................
I opened up a strip to the port side of the mast but it was dry!
Anyway, the mast and the hatch have been completely blocked. The balsa core was exposed at both locations, creating my little nightmare.
...................................................................................................................................
Behind the hatch is a fitting that has to be re-drilled (two actually!) They have been filled with solid fiberglass, no core at all. In the bottom left, you can see one of my test cores. I have drilled a few under the sides, to my surprise, the core is plywood.
I found a damp spot over the TV. It has been open for a month and is dry. It is near impossible to get everything 100%. That said I think I have turned the tide, There is always something to do, something to fix. There are a few boats in the yard with wet hulls. That is a death sentence, it is the reason I always insist on buying boats with solid hulls.
..........................................................................................................................
A couple of more shots. hopefully, I will have a picture of the finished product next week.
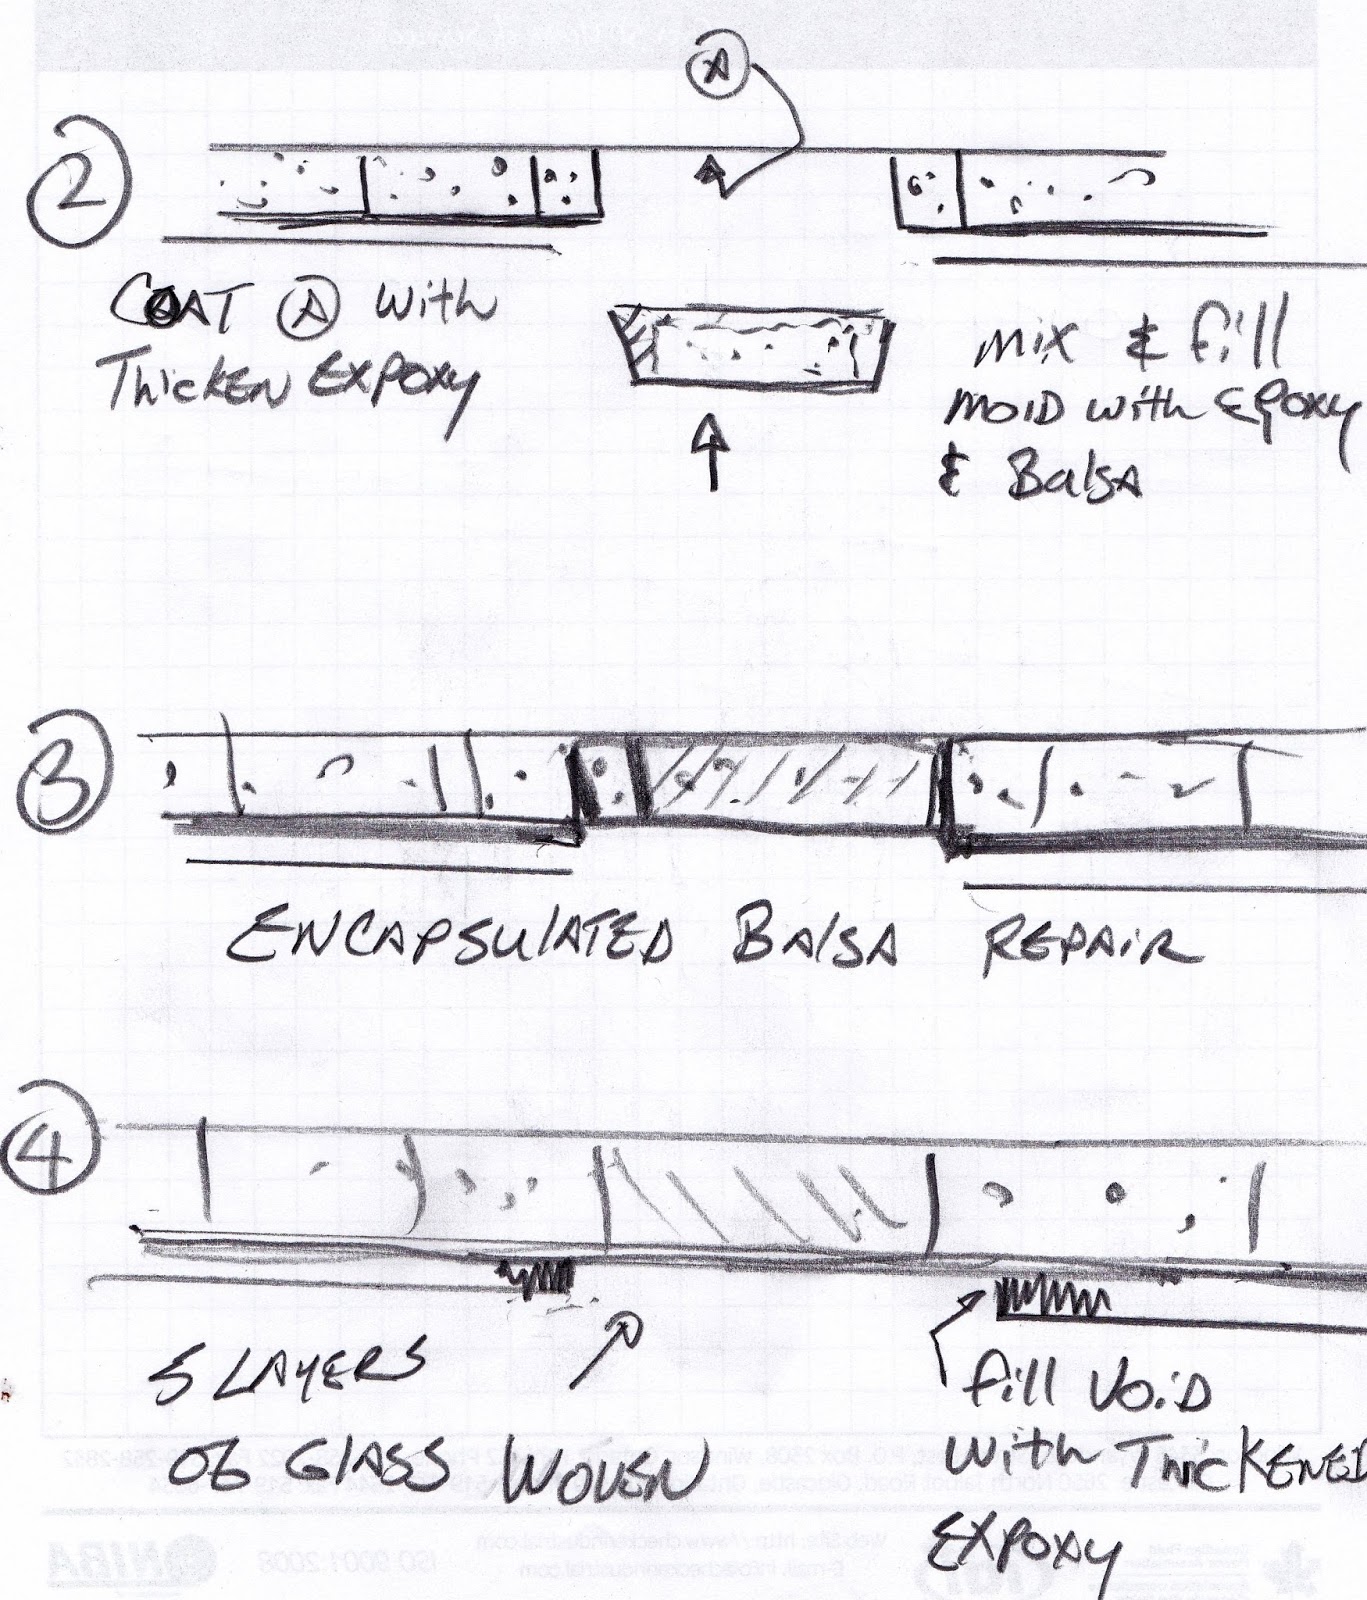
So, for the sake of anyone who might be interested, here is a sketch of the method I am using to repair wet spots in the cabin roof of an O'Day sailboat. Step one, I used a Fein tool to remove the inner shell and then the inner layer of the top proper. the damaged balsa was scraped out, the top layer prepped and coated with a layer of epoxy.
I have explained my method of encapsulating every piece of end grain balsa. This ensures that it can not get wet again.
I back fill the void between the actual top and the inner shell and then grind it back in order to get a good bond.
So I keep showing the bad area by the hatch. I have pretty much finished filling, I used a long board to get it straight and now I am at the fine sanding part of the program.
After work I pulled the rails. I want to refinish them. I had two that leaked as the bolt that holds them in place goes thru the cabin top. I bored 1 " holes up to the top layer on those two. The core is dry so the leak must have just ran down the long bolt. I made a couple of guides in order to hold the hole location when I refill. I made them on a lathe today. There is a pin that goes thru the drilled hole in the outer layer. the segment after that is tapered 1 degree (A draft angle) I will wax the pin and locate it. Then using rings of woven glass and epoxy, I will fill the hole back in. I should be able to tap on it from above to knock it out, leaving a core for the new bolt to go thru. Once the fiberglass is built up to being flush, I will grind it back a little and finish with a two part filler. the trick here is to keep that layer thin. I built a long board and have sand paper starting at 80 grit, down to 220. That is going to be fun! Well...onward!